follow it's just me... on Pinterest.

Follow Me on Pinterest

Sunday, July 31, 2011

.Every man or woman needs a "mancave".

Hello everyone...it's just me again "bouncing" around.  I am back in our family room this time focusing on an area that is considered my husband's "man cave"  sort of... Actually, it is a fun area that we all have enjoyed decorating and adding our ideas.  My husband has voiced his concern that he worries I may try to feminize this space.  What???
 
When we moved into our home we knew the direction we wanted to go with a corner of our family room.  We both wanted our home to be comfortable and welcoming to friends and family, a place everyone would enjoy.  With entertaining in mind we designed our "sports" bar.  It started out very sparse.  I was worried that it would become too busy and take away from the rest of the room.  Here is our sports bar before...  It looks different now.
Minimally Decorated
I refer to this space as a sports bar, an amusing collection of eclectic pieces of memorabilia, old and new.  Most mean something to our family, but there are a few, purely for conversation, that are not meant to be taken literally, ha ha!

Some items are quirky, even kinda goofy, but hopefully they make you laugh.  I tried to photograph the space as a whole to show the full look, but also zoomed in to give you a sampling of the variety we have. 


I had fun showing this to you.  See you soon. heather

Sunday, July 24, 2011

not. so. ordinary. kitchen


I hope you don't mind; I am jumping around a bit.  In future posts I will share more of our family room, but for now I wanted to tell you a bit about our kitchen.  Our kitchen has been a small rehab project.  This picture was taken by the sellers' prior to putting it on the market.

"Before" Kitchen


"After Kitchen"
We removed the kitchen door leading downstairs (shown in the "before" photo).  It took filling, sanding, and painting after the door/hinges were removed, but you would never know a door was ever there.  I painted the kitchen a "taupe" color.  (Sorry, I can't find the name of it, only the number code.)  We found small glass tiles at Lowe's that we liked and tiled the back splash.  We changed out the appliances.

Our cupboard hardware was purchased at http://www.ikea.com/, and we spray painted the existing cupboard hinges.

We priced the hinges out, and they would have cost about $60 to replace.  The Brushed nickel http://www.rustoleum.com/ spray paint went on flawlessly.  It is great to find an inexpensive alternative.  It takes time to change them all out but is big on impact.        

I love the chunkiness of this hardware.


Tiling was one of the first changes we made.


After doing some IKEA shopping, we both agreed that we liked the look of glass in cupboard doors.  Putting our heads together, we came up with something "out of the ordinary."  We considered stainless inserts, but found something we liked better.    


A drop-ceiling light cover was our choice.  Actually, we used the backside of a textured light cover.  It looks like crushed seashells to me.  One $8 light panel was enough to do all four inserts.  Our kitchen is small so we added inserts only in the cupboards framing out the window.  It was important to me that the cupboard doors retained a thick border.  The doors to the left of the window are smaller and have a smaller insert.  The outer border of all four doors are the same thickness.  I am lucky that my husband is precise and was able to cut and router out the doors; otherwise this project would not have been possible. 
Texture of cabinet door inserts


We added floor tile to our bulkhead (kinda cRaZy) and finished out with trim we spray painted "brushed Nickel."   
    
Tiled bulkhead with Nickel trim

One of my favorite additions was the easiest...We purchased two ClosetMaid, Espresso, 9-cube organizers from Target.  They retail for $49.99 each.  My husband came up with the idea of stacking them on top of one another and using them to display my Fiestaware.  To be honest, we have dishes in the cupboard we use for everyday.  The Fiestaware isn't behind glass (can get a little dusty) so I run it through the dishwasher before use.  It is the same concept as open shelving, I suppose.  The two cubicles are mounted together and attached to the wall.  We had looked at curio cabinets, but could not find the dimensions we needed.  This piece has become the focal point in our not. so. ordinary. kitchen. 

I appreciate you taking the time to see it... heather              


Tuesday, July 19, 2011

our .sweet. door

I fell in love with this re-purposed door from http://thepleatedpoppy.com/ .  I spent a couple days admiring it, and decided it was something I wanted to try.
Initially, I thought I may happen to "just stumble upon" an old door somewhere.  I know a local antique mall in town that sells them, but I wanted to try and keep my costs down.  If I happened to find one at a garage sale would I be able to get it home if my husband was at work?  Basically, it came down to patience...or lack of...I was excited to start this project and I didn't want to wait.

Here is the sweet door hung horizontally in her bathroom. 
I have a friend who owns Southbarn Antiques here in town.  He was willing to let me come out and look at his old doors.  Did I forget to mention he has over 150?  How do you choose?  I needed a door with glass at the top so it could sit vertically.  I ended up coming home with a very old, worn, 3 pane door.  It needed lots of TLC.     
This face plate was on the back of the door.  I couldn't wait to see it on the front!

I must say, this was .a lot. of work.  Thankfully, my husband was .a lot. of help.  We started by using a stripper, which removed about 3 layers of old paint.  We later found out we had about 3 more layers to go.  It took a few hours to apply and re-apply the stripper (it was sooo humid, it took extra time to dry).  Finally, after lots of scraping we were down to just wood on the front and back.  We applied a generous coat of mineral spirits to both sides of the door to stop the "stripping" action.  
Ready for primer
We primed both sides of the door.  My husband cut and added molding to take our 3 pane window to a 6 pane window.  I really wanted more than 3 panels to display photos.

I chose Spring Garden (9B-4, Pittsburgh Paints) as my paint color.  We painted, sanded, and outlined the window panes with a dark Teal green.  My husband found a box of glass doorknobs that his grandparents had given him.  The face plate from the back, and glass knob didn't fit perfectly, so I added an outline of Teal paint.
 
I used a different scrapbook paper in each pane of glass.  You could also use fabric mounted over cardboard as http://thepleatedpoppy.com/ did.            

Our .sweet. door.

Your door becomes .sweet. when your pictures are in it.
Doors can be used for so much.  I have seen beautiful headboards come from refurbished doors.  I wanted to share this photo with you.  What a neat use of this door... heather


Saturday, July 16, 2011

.as simple as black and white.


When we purchased our home about a year ago, there was one room that stood out and became our deciding factor.  Ok, maybe the five bedrooms helped a little too.  Really, this family room was just what we were hoping for.  We anticipated it being the "catch all" for our family, and it is.
     
Our family room has vaulted ceilings so the height of this room is nice to work with.  I have used the space to the max and filled the walls.  My longest wall, displays all of our black and white photos.  I have many sizes of frames, all black, but different.  Some have white mats, some are plain.

My husband has five antique cameras that we included among the pictures on the wall.  I purchased two black, floating shelves from Target to display them. 

I recently decided to take it even further.  We had a left-over board, stained and distressed from a previous project.  I needed to fill the empty space over our patio doors.  So, I re-used the board and now have more space to display my black and white pictures.  Last week, I picked up two white frames at a garage sale.  I am coloring outside the lines and using these on my shelf.   
Before.


After.

I found some wonderful ideas I wanted to share.  I hope you like them as much as I do.  These ideas can be used on mantle's, shelves, cupboards...


 This beautiful ensemble came from the dining room of http://thepleatedpoppy.com/ 


I think this is genius.  Globes and old suitcases, so neat.  I wish I had room above my cupboards.  Thanks again to http://thepleatedpoppy.com/


Mantle display 


Here are Lisa's before/after pictures for her book covers shown above.

My "after" shelf collaboration.

I found a wooden pair of candlesticks in our garage that I painted white and sanded.  I used my garage sale frames,  a canning jar (from my cupboard) with branches, covered a few books with scrapbook paper, my husband's old camera and baby shoes, and a blue jar from a friend.  I spent about $12 on three shelf brackets, $4 on picture frames, and $6 for my blue jar.  In total, it cost $22 for my little collection including my recycled shelf.   
  
Another family room project is in the "works".  I can't wait to show you!  If all goes as planned I hope to finish it this weekend and post pictures soon.
   
"If you use other's ideas,  give proper credit, and add your own personal touch it is a compliment to that individual".  It's .as simple as black and white.  Thanks for coming to visit.  Heather 

Sunday, July 10, 2011

.this lil' light of mine.

I have a few blogs that I follow loyally.  They are, in so many ways, such great inspiration.  I have found some of the BEST projects and BEAUTIFUL home decorating ideas.  I look forward to every post.  I am always amazed by the cReAtiViTy.
 
On the right side of my blog are my fav's, listed in yellow.  Click on them and you will be directly linked to their sites.  They are worth looking at.

My husband and I took a little time out Saturday to check out a local flee market and antique shop.  Remember, antiques are very "new" to me.  I always like looking, but I am not sold on the smells.  Of course, antique finds don't smell fresh.  I got over it.  I had fun.

From http://thepleatedpoppy.com/  I found a project I was on a mission to try.  Showing my husband the inspirational pictures, he had an idea of what I was looking for before we went shopping.  Here is my inspiration.  
I looked, but couldn't find a lamp frame.  So, I decided to try something untraditonal, a bird cage.  I found a white, rod-iron cage for $24, and purchased the light kit at Menard's for about $6.
 
My family room is primarily black, white, taupe, and grass green.  I used fabric remnants in those colors that I had from other projects.
  
Start by cutting your fabric strips.  I chose to cut mine about 2" x 14".  I found it easier to cut them long and later trim the extra.  Knot to the frame being sure to keep pressure and your fabric facing right side out.  Please ask in my comment box if you have any questions.  I will be happy to answer them.  The pictures are the best examples.
     

..i hope you leave today with one more idea than you came.. heather

Tuesday, July 5, 2011

More dining room projects.

I have come to realize that my home is a "sort of" museum.  Not because things are so old, but because I have many rooms with different decorating styles or themes.  Though, I always admire simplicity.
 
A longtime favorite of mine is Pottery Barn.  PB represents simplicity well.  I like everything PB has to offer, but tend to try and reproduce their traditional style while adding a little more flair.  Color.Color.Color.  I am stuck on it.  The projects I am sharing with you today are easy ways to introduce more color, pattern, and texture in any room. 

I have found a few blogs that I enjoy following.  They seem to come up with the best decorating ideas and I love to try them all!  Here is an idea that I picked up from brambleberrygrace.blogspot.com  
  

Dining Room
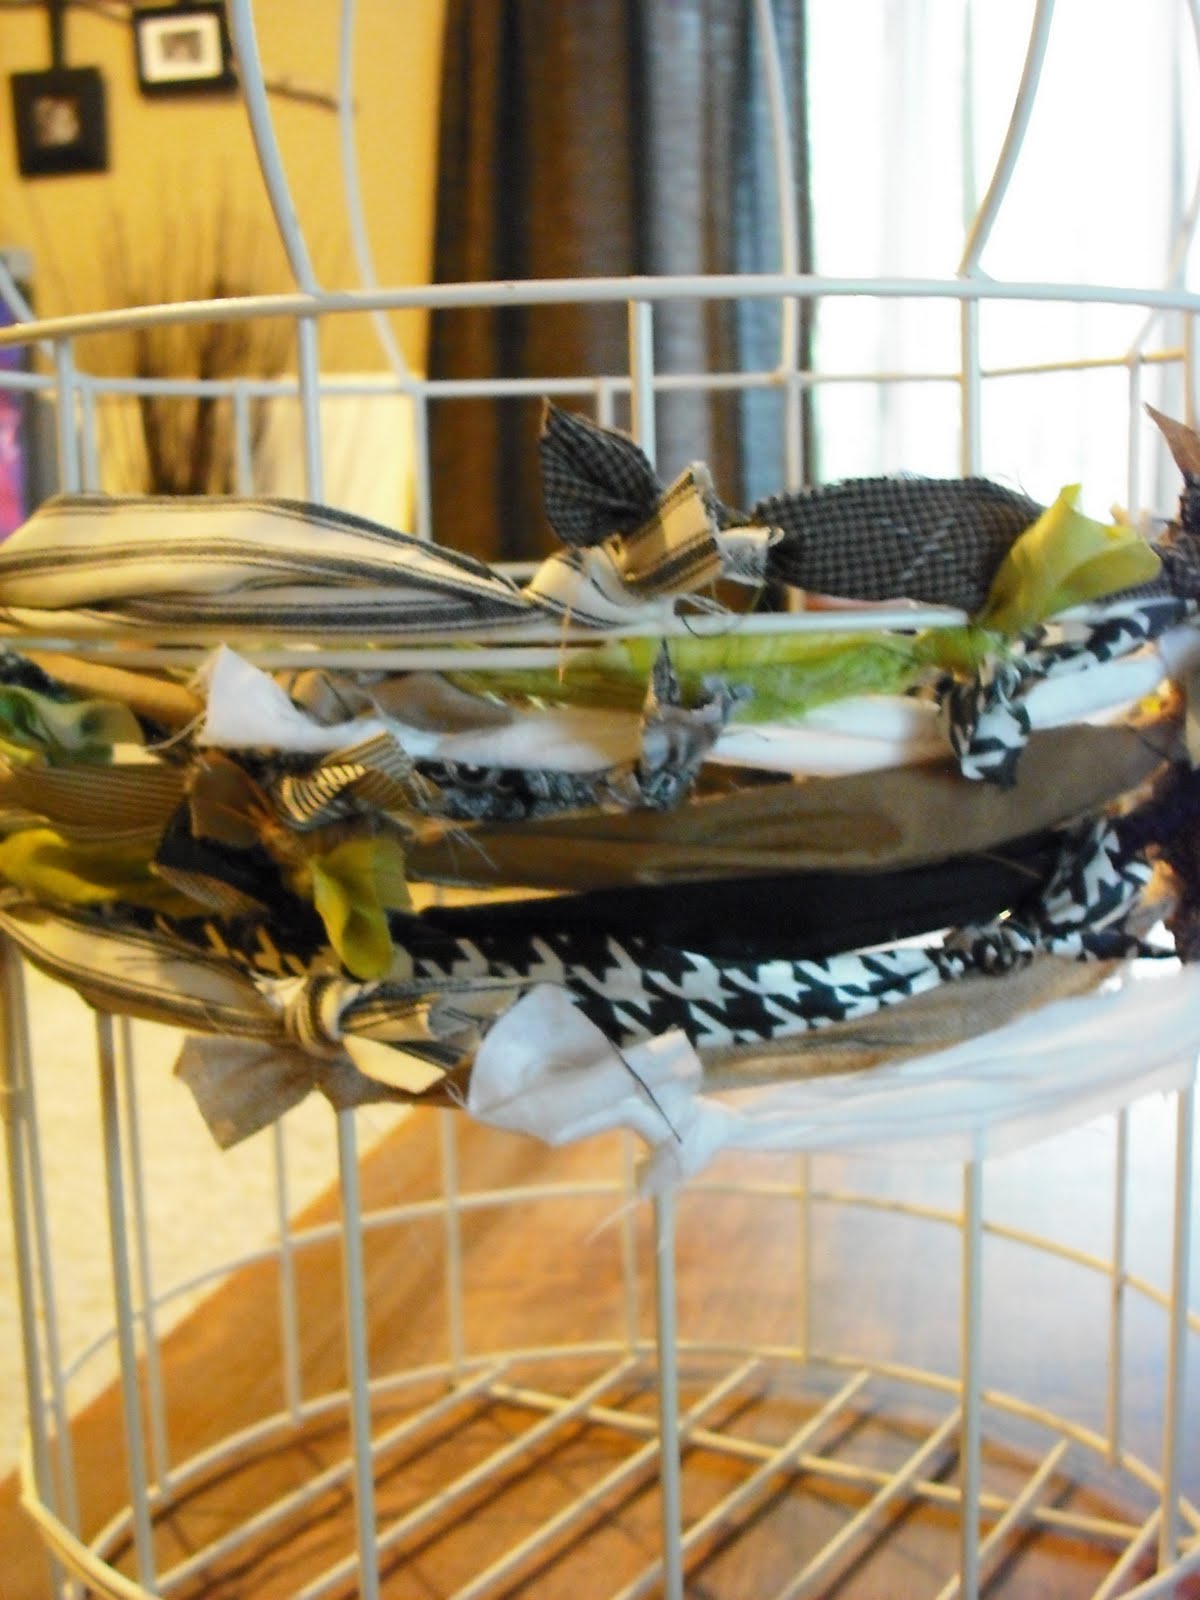
These circles are made from wooden embroidery hoops.  Joann Fabrics is where I found mine.  I think I bought the store out.  I purchased so many.
I left my hoops the "natural" wood color, but you could definitely spray them to match your decor; nickel, black, brown, gold, etc.  Choosing fabric is the fun part.  I was able to use lots of remnants that I had from previous projects.  This project is very easy and does not require much time. 
I ironed my fabric and placed inside the interior and exterior hoops.  The exterior hoop will require tightening from the metal clasp once interior hoop and fabric is in place.  Pull tightly and trim off excess fabric as close to the hoop as possible.  Mine did not require any additional finishing as I got a very close and clean cut.  I found it is the easiest to hang the hoops by the metal fastener.  Plan your fabric accordingly so that your pattern corresponds, placing the metal piece at the top of hoop.  One little nail is all it took to hang each. 

My now dining room was a living room to the prior homeowners.  The problem this imposes is that it is not wired for an over-the-table light fixture.  I know it could be done, but I am not wanting the mess involved.  So, I have chosen to light the dining room with lamps, floor lights, and sconces.  Even so, I still felt that it needed something over the table.  I chose to decorate a large wreath and suspend it from the ceiling, in a very non-traditional way.


I purchased a wreath (about 28") from Michaels.  Also, I picked up a variety of eucalyptus, silk flowers, greens, straw flowers, and peacock feathers.  My color scheme was that of brown, bronze, copper, deep orange, ivory, and dark teal.  I chose to wire all the flowers, etc. on, but you could also use a glue gun.  Whichever you choose, remember that there is no back/bottom that will be hidden on this wreath.  The bottom will be directly visible when you look up from the table.  I suspended the wreath from the ceiling with dark brown ribbon and a plant hook.
                   
Thank you for reading.   Please feel free to ask questions, or leave comments in the comment box at the bottom of my page.  I will be happy to reply.  


Saturday, July 2, 2011

Something Old...Something New

My husband and I were married in March, each bringing two different styles of decorating to the table.  I have many style likes...traditional, contemporary, eclectic, etc.  My husband likes antiques.  I have to admit, this is probably something I never really envisioned myself having an appreciation for.  However, I wanted our "new to us" home to be a collaboration of both our tastes.  So, thus became our very old and new dining room.

Years ago, my husband was given a beautiful buffet from his grandparents.  It has been fun incorporating this piece as a focal point in our dining room.  Pier 1 Imports is a favorite store of mine.  I have tried to carry out their eclectic style throughout.  We did receive a large bronze wall mirror from Pier 1 as a house-warming gift from a friend.  This is a nice anchor in the space.  Otherwise, most items are either pieces I have made, or found at garage sales or thrift stores.


Better Homes and Gardens

I love how they used a grouping of six.
I was limited on space, so I chose to do only two.


From Better Homes and Gardens I found a wonderful idea that I have implemented in my dining room.  Shadow boxes showcasing decorative plates.  I chose to use scrap book paper in the back of the boxes to add more color and texture.  There are an unlimited amount of mediums you can use to customize your boxes; wallpaper, news print, fabric, etc.  I did shop Pier 1 for my plates as I was looking for certain colors.  I know if I had just been more patient, I would have found a couple at thrift stores or sales.  I picked up two shadow boxes at Michaels for around $11 each.

Mine
I have other projects I can't wait to share with you!  Heather